A shot list is a detailed checklist of every planned camera setup, including framing, angle, movement, location, talent, and notes, arranged in shooting order. It’s created during pre-production, refined after the location scout or storyboard review, and used on set to coordinate the crew, plan gear and lighting, maintain continuity, and track progress. Directors, cinematographers, producers, and content creators rely on shot lists for short films, commercials, weddings, and product shoots, any project where timing is tight and precision matters. This collection includes free, customizable, and printable shot list templates to help you get started.
Shot List Templates
Social Media Shot List Template

Video Shot List Template

Shot List Template

Wedding Shot List Template

Narrative Shot List Template

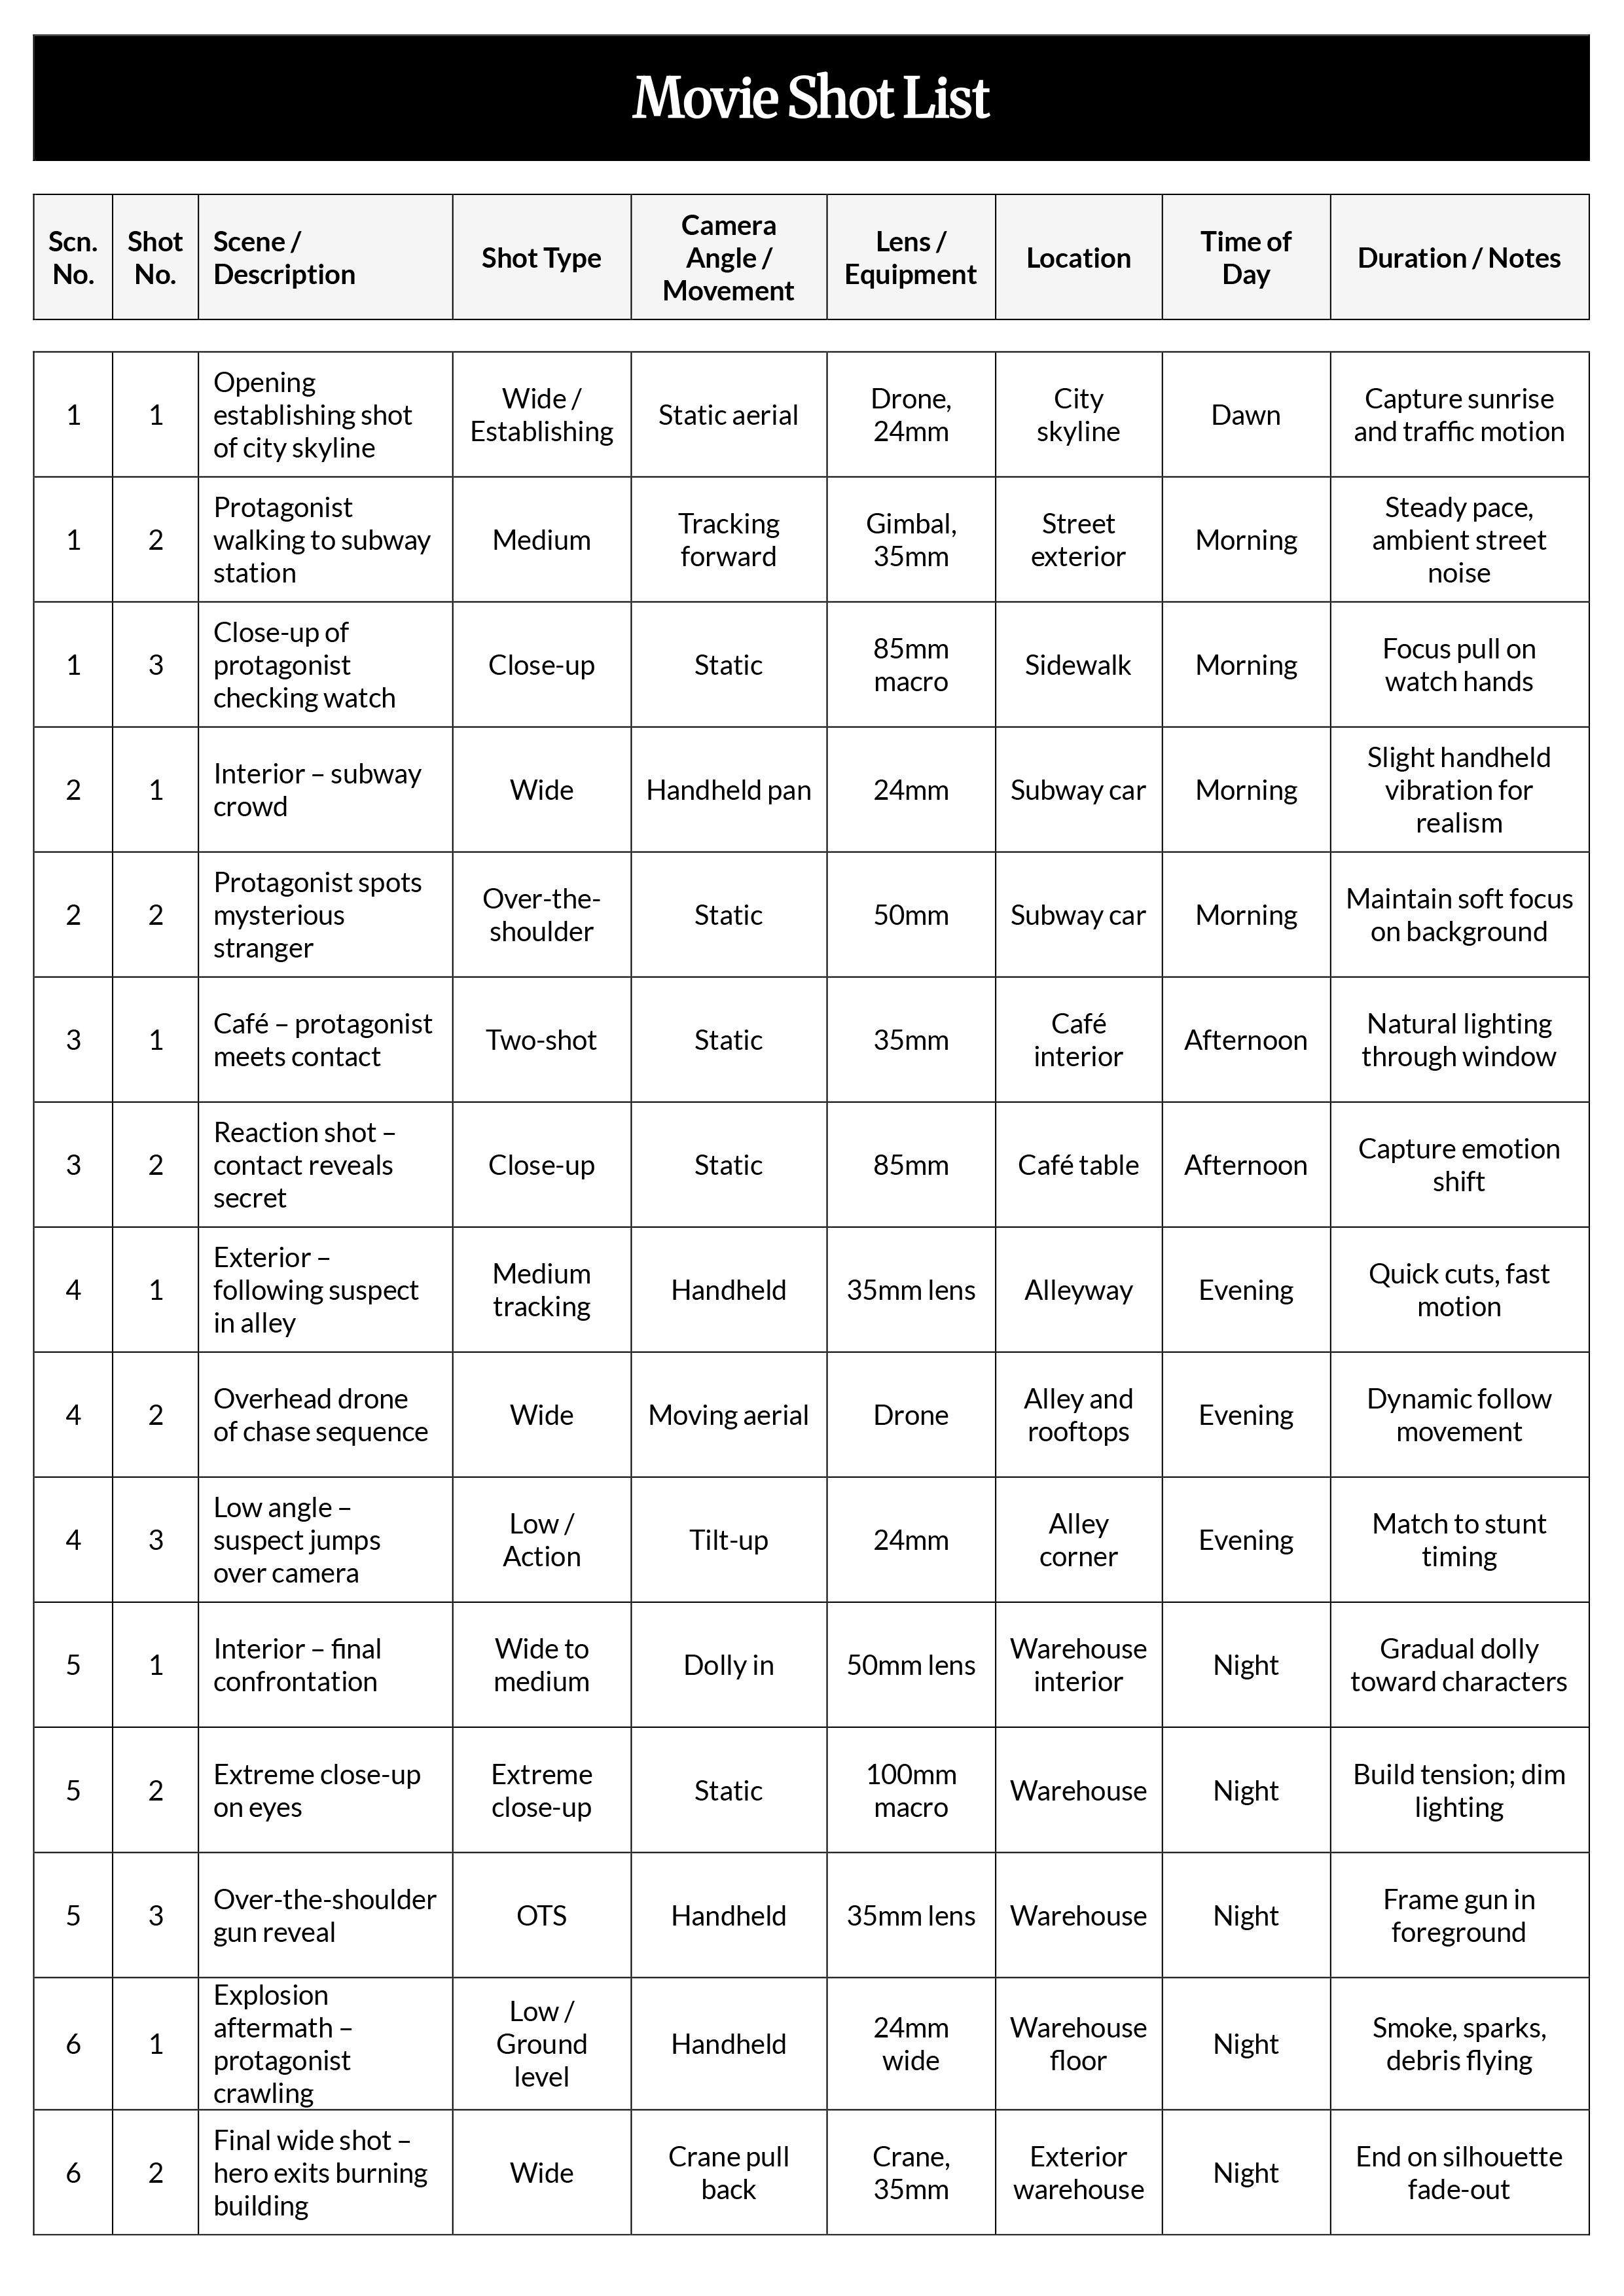
Movie Shot List Template
Camera Shot List Template

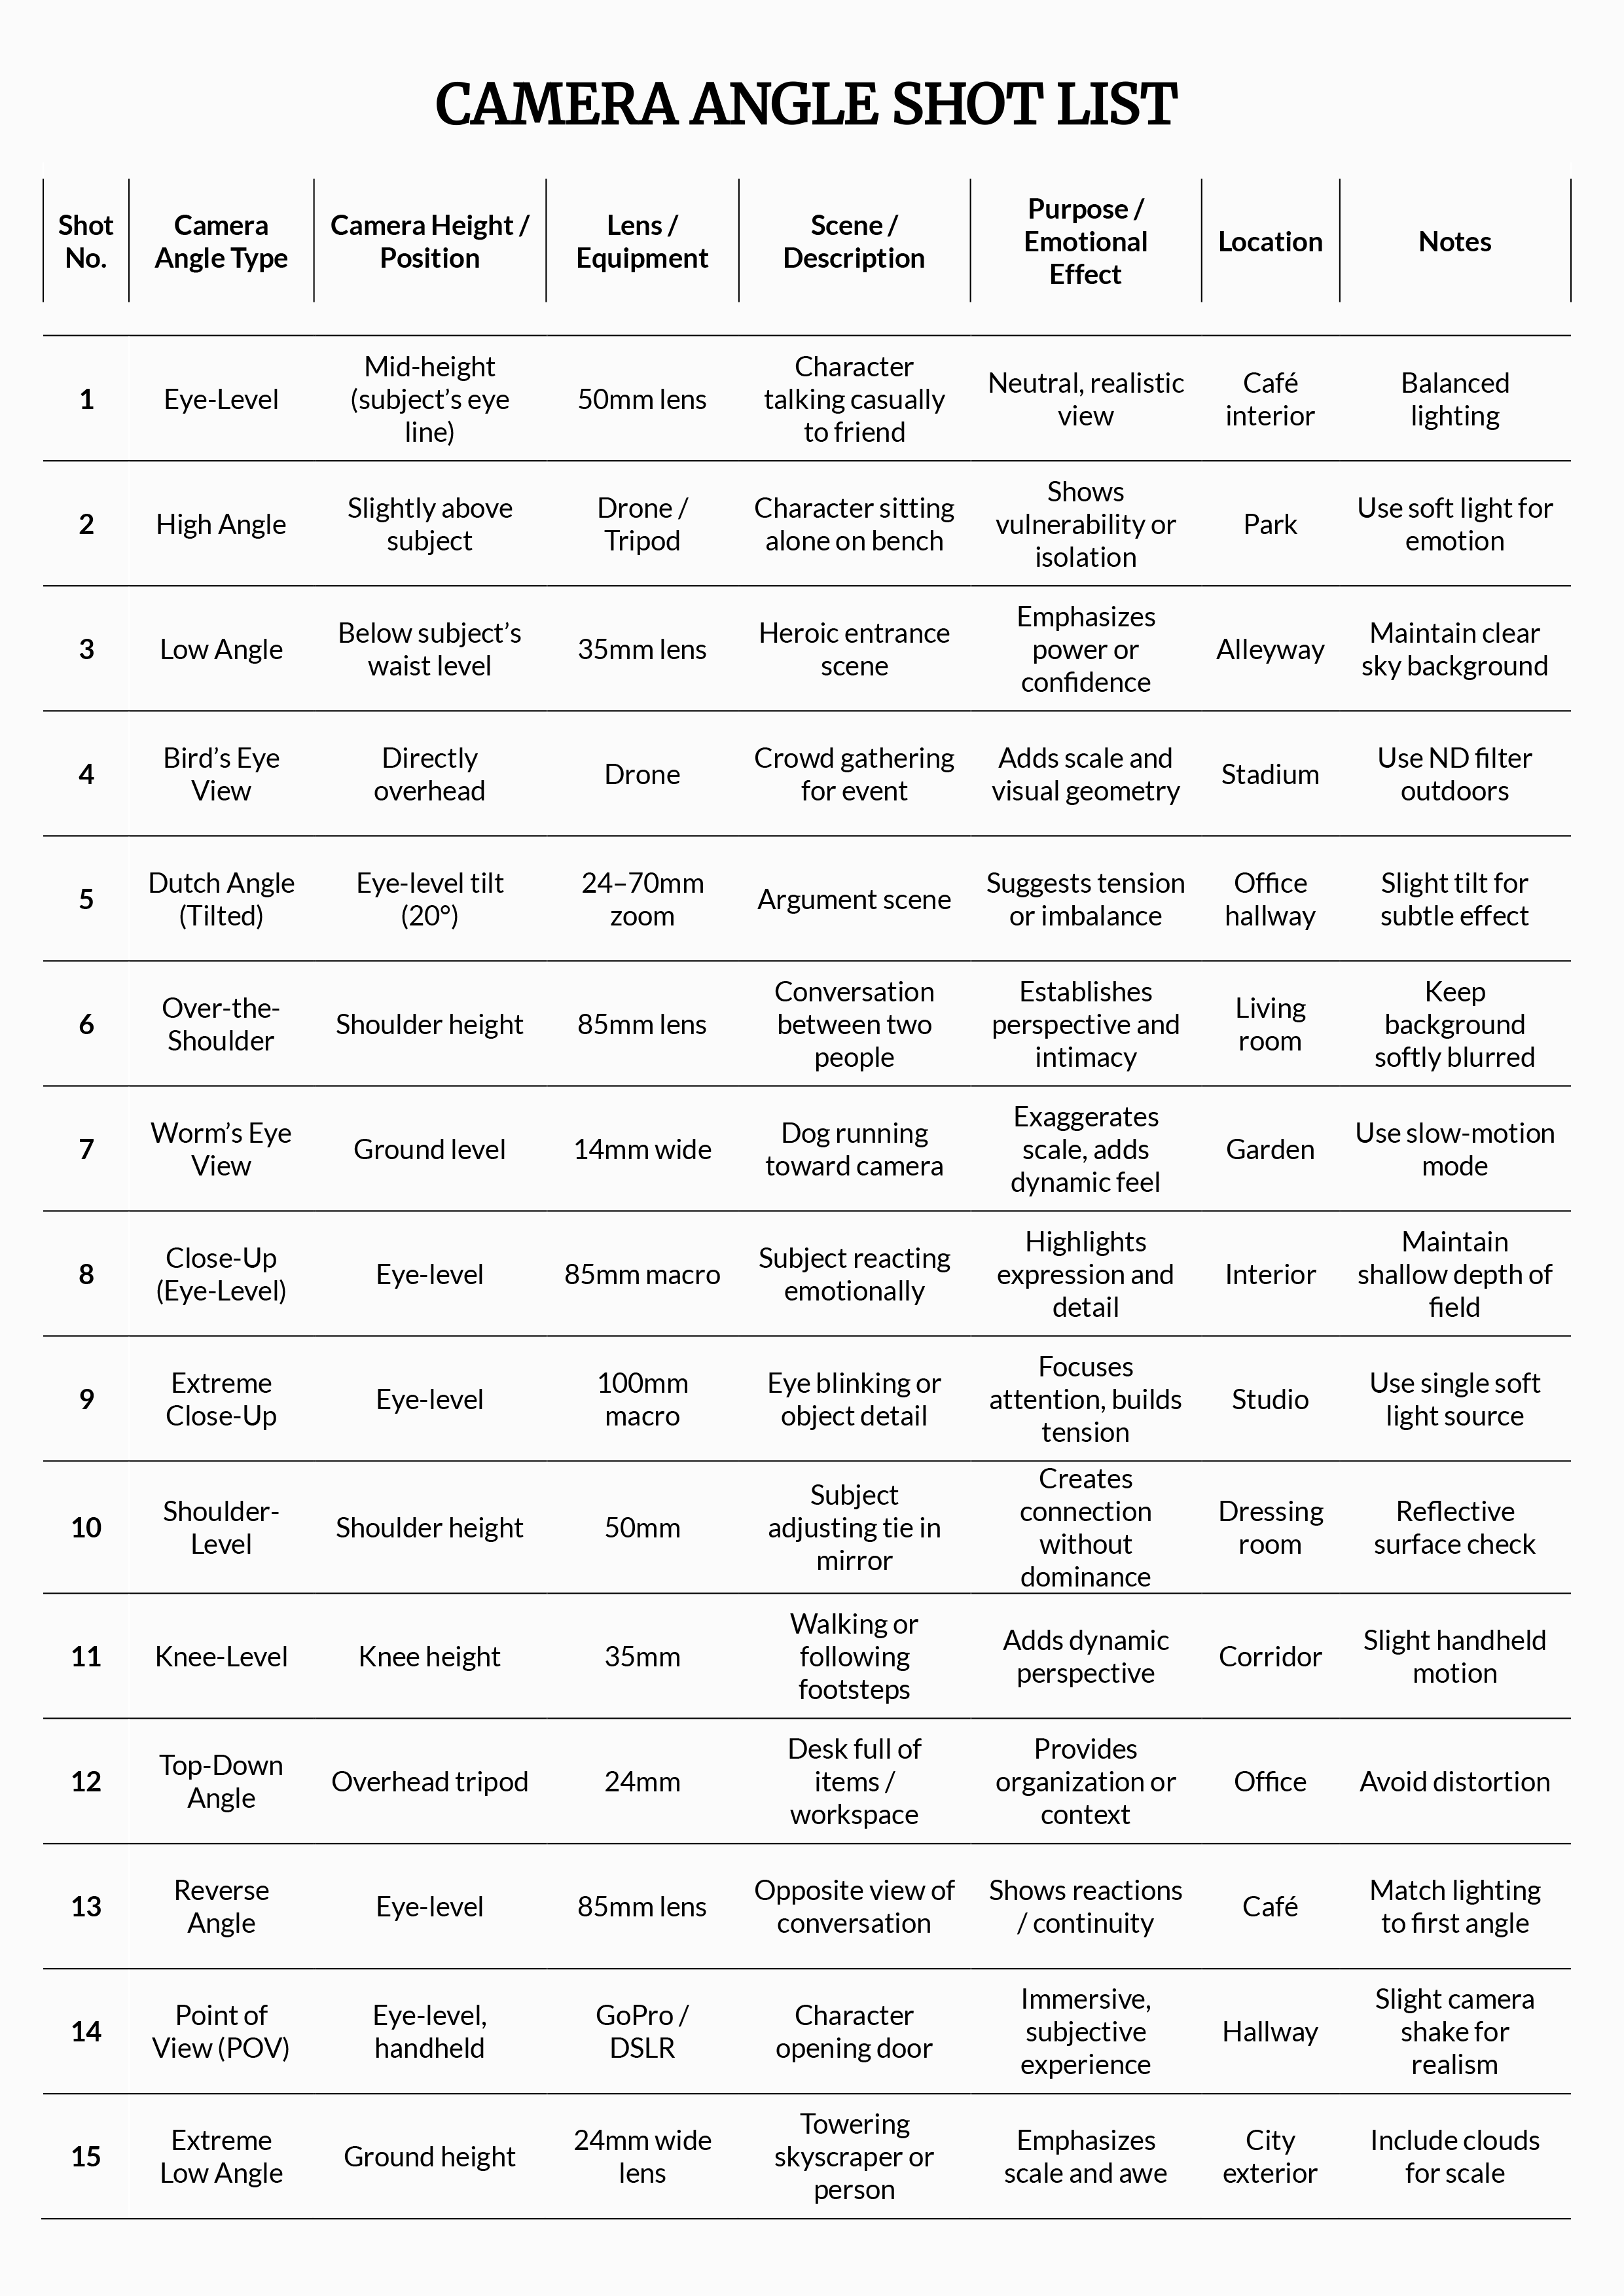
Camera Angle Shot List Template
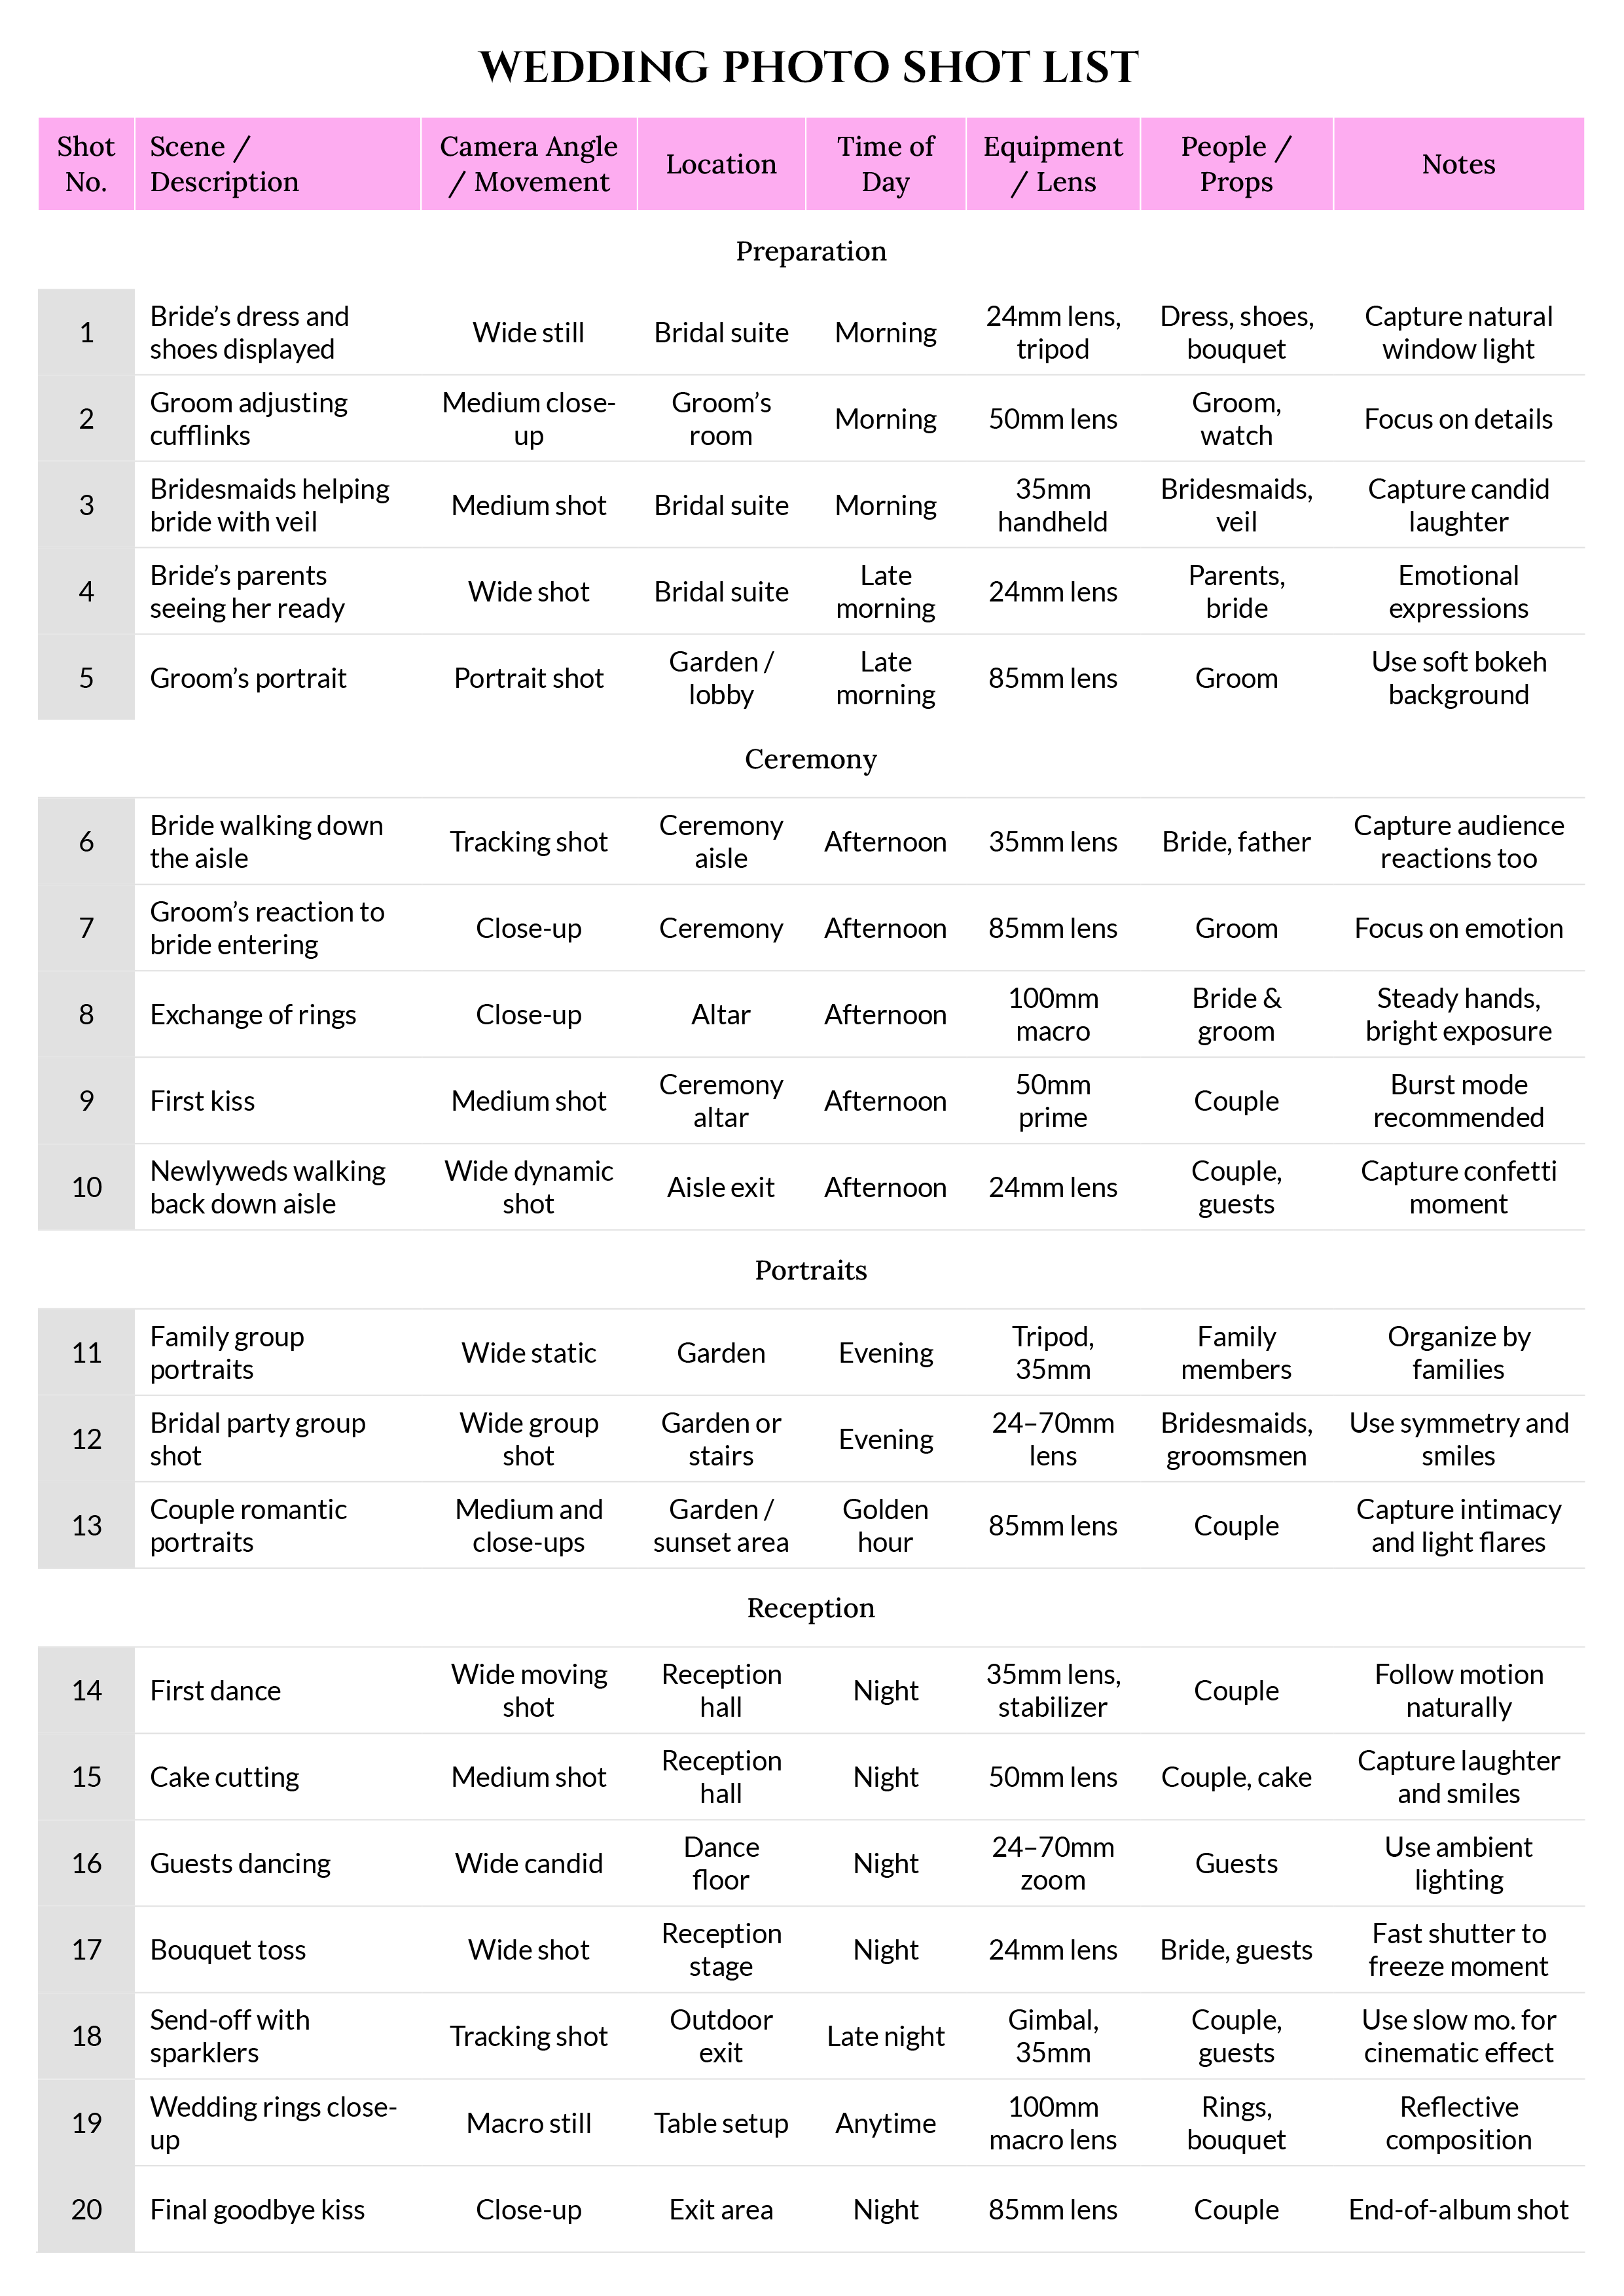
Wedding Photo Shot List Template
Filming Shot List Template

Infant Shot List Template

Real Estate Photography Shot List Template


Documentary Shot List Template


Social Media Shot List Template


Music Video Shot List Template


Travel Vlog Shot List Template


Event Photography Shot List Template


Product Photography Shot List Template


Portrait Session Shot List Template


Drone Shot List Template


Food Photography Shot List Template


Short Film Shot List Template

Real Estate Videography Shot List Template

Newborn Photography Shot List Template

Studio Photography Shot List Template

Corporate Training Video Shot List Template

Action Scene Shot List Template

Behind-the-Scenes Shot List Template

Camera Shot List Template

What Is a Shot List?
A shot list is a planning document that turns a script, storyboard, or creative brief into a detailed record of every shot to be filmed. It breaks each scene’s visual intent into individual camera setups and explains how those moments will be captured, arranged in the most practical shooting order. Unlike a storyboard, which illustrates composition, a shot list is written and centers on coverage, logistics, and method of capture. It serves as the crew’s working reference for what must appear on camera and the sequence in which it will be filmed, keeping the production organized and aligned before shooting begins.
Essential Elements of a Shot List Template
A well-built shot list works like a production plan for the day; it outlines what needs to be captured, how it will be filmed, who’s involved, and how long each setup may take. Each field serves a purpose in keeping the crew organized and the shoot efficient.
- Production Title and Project Info: Names the project, client, deliverable, and episode or campaign. Clear identification keeps paperwork, slates, and exports aligned with the correct job.
- Date and Version: Records the latest revision and when it was issued. Crews know they are using the current plan and can trace changes if something shifts on the day.
- Scene or Sequence ID: Assigns a unique code to each scene or story beat. This ties shots back to script pages and simplifies scheduling and reporting.
- Shot Number: Provides a simple index for each planned shot. It links directly to slate numbers and post-production logs.
- Shot Description or Action: States what the audience should see or understand in the frame. Focus on the beat, performance, or visual moment rather than camera jargon.
- Shot Size and Framing: Specifies composition such as wide, medium, or close shot, plus any key framing notes. This preserves intent for coverage and editing.
- Camera Position and Angle: Describes vantage point, height, and orientation, for example eye level, high angle, or over-the-shoulder. Consistent positioning supports continuity across takes and setups.
- Lens or Focal Length: Notes prime or zoom and the planned focal length. Perspective and depth of field choices stay consistent across matching shots.
- Camera Movement: Details movement type and path, such as static, pan, tilt, dolly, gimbal, crane, or handheld. Include start and end cues so timing can be rehearsed.
- A-Cam and Additional Cameras: Indicates single or multi-camera coverage. Mark which angle is primary and list any secondary angles for pickups or cross-coverage.
- Audio Plan: States dialogue or MOS, microphones, and special needs like wild lines or room tone. This prevents missed sound elements that are costly to recreate later.
- Lighting Notes: Summarizes key sources, direction, practicals, color temperature, and any reference exposure. A few cues keep the look repeatable across setups.
- Location and Time of Day: Lists address or stage, interior or exterior, day or night, and any environmental considerations. This informs transport, power, and weather backups.
- Talent and Blocking: Names who appears in the shot and how they move or hit marks. Include business that affects continuity such as opening a door or picking up an object.
- Props, Set Dressing, and Wardrobe: Identifies hero items, consumables that need resets, and wardrobe states. This reduces continuity errors and delays between takes.
- Continuity Notes: Captures details that must match adjoining shots, such as drink levels, screen content, hair, or makeup state. Small specifics protect edit integrity.
- Special Requirements and Safety: Flags stunts, minors, animals, vehicles, water, pyrotechnics, or drone use, along with the safety plan and approvals. Safety and compliance remain visible to every department.
- Estimated Duration and Priority: Provides a time estimate per shot and a relative importance rating. This supports a realistic schedule and smart trade-offs if time compresses.
- Shot Order or Board Order: Arranges shots by setup to reduce resets and company moves. Order on paper translates to an efficient day on set.
- References and Links: Points to storyboard frames, script pages, look references, or rehearsal clips. Quick access to source material keeps decisions consistent.
- Slate, Roll, and File Naming: Notes scene-take format, media roll numbers, and clip naming conventions. Clean metadata speeds handoff to dailies and editorial.
- Status and Checkboxes: Tracks planned, in progress, completed, hold, or reshoot states. A simple mark prevents missed coverage and clarifies what remains.
- Owner and Notes: Assigns a responsible lead, for example director, DP, AD, or department head, and leaves space for last-minute adjustments. Clear ownership keeps questions directed to the right person.
How to Make a Shot List
Creating a shot list turns creative intent into an actionable plan for production. Start by defining your objectives, audience, and any logistical limits. Break the script or brief into clear beats, then decide how each will be covered. For every beat, include specific notes on framing, angles, lenses, movement, sound, lighting, blocking, continuity, and safety. Finally, organize shots by setup and time of day, estimate durations, set priorities, and version the document so the entire crew works from the same reference, from scout to wrap.
Define Objectives and Constraints
Confirm deliverables, platforms, and run time. Note brand or creative requirements, target audience, aspect ratios, languages, and captions. Record hard limits such as budget, crew size, daylight window, location access, and union or permit rules. Clear boundaries guide every choice that follows.
Break the Script or Brief into Beats
Read each scene and mark the moments the audience must understand. For unscripted work, list interview topics, story beats, and recurring visual motifs. Each beat should express a single idea or action that one or more shots can cover.
Choose a Coverage Strategy
Decide how you will cover each beat. Narrative projects often use a master for geography, mediums for performance, close-ups for emphasis, and inserts for details. Interviews pair A-roll with planned B-roll that illustrates each talking point. Live events benefit from wide safety angles plus highlights and crowd cutaways. State the reason for every shot so nothing feels redundant.
Select Shot Sizes and Framing
Assign a size to each planned shot (wide, medium, or close). Add framing notes such as over-the-shoulder, profile, two-shot, or centered symmetry. Explain what viewers must notice in the composition, for example hands assembling a product or a reaction that advances the story.
Set Camera Angles and Movement
Describe vantage point and height, then any movement. Examples include eye level, low angle, high angle, static, pan, tilt, dolly, slider, gimbal, crane, or handheld. Specify start and end marks, speed, and intended emotion so operators and talent rehearse toward the same target.
Choose Lenses and Core Settings
Pick focal lengths that match the look and perspective. Note frame rate, resolution, and shutter for slow motion or low-light needs. Include white balance targets and any filtration such as ND or diffusion. Consistent notes prevent mismatched depth of field or motion cadence across a sequence.
Plan Audio Intentionally
State whether the shot is dialogue on-camera, off-camera narration, music-only, or MOS (recording picture without sync sound). List microphones and placements, backup recorders, and special items like wild lines, room tone, and practical sound effects to capture on set. Good planning avoids costly pickups.
Plan Lighting and Visual Continuity
Summarize key sources and direction, practicals in frame, color temperature, and contrast goals. Call out repeatable cues so matching shots can be recreated after resets or location changes. Add a short note on weather or time-of-day conditions that influence natural light.
Define Blocking and Performance Beats
Describe where subjects start and land, eyelines, and specific business such as opening a box, pouring a drink, or pointing to a screen. Note actions that must match across angles. Clear, precise directions reduce retakes.
List Props, Wardrobe States, and Set Details
Identify hero props, consumables that require multiples, and wardrobe continuity such as rolled sleeves or a stained apron. Include screen content, printed materials, and signage. These details prevent delays between takes.
Confirm Continuity and Screen Direction Rules
State travel direction and conversation sides. Add reminders about the 180-degree guideline and angle changes that keep edits smooth. Mention hair, makeup, and prop states that must remain consistent from shot to shot.
Map Special Requirements and Safety
Flag minors, animals, vehicles, water, stunts, drones, or pyrotechnics. List permits, guardians, wranglers, and safety officers. Add medical, security, or traffic control notes. Safety planning belongs inside the shot list so all departments see it.
Group by Setups and Order Efficiently
Reorder shots by location, lighting setup, and time of day to minimize resets. Keep a note of original script order for editorial reference. Efficient sequencing saves time without sacrificing coverage.
Estimate Time and Set Priorities
Give each shot a realistic duration, then tag priority as must-have, nice-to-have, or pickup. Add buffers for company moves, lens swaps, talent resets, and technical checks. When time compresses, priority tags steer smart trade-offs.
Plan Single and Multi-Camera Coverage
Indicate A-camera and any additional cameras with their angles and purposes. Cross-coverage can preserve performance continuity if angles complement each other. Note sync method and any slate variations for multi-cam.
Add References and Source Links
Attach storyboard frames, mood stills, rehearsal clips, and script page references. Keep filenames or URLs consistent with scene and shot numbers so editorial can trace intent later.
Prepare the Document Layout
Create columns for the essential elements you defined earlier. Add the project header, date, and version. Include a small legend for abbreviations such as WS, MS, CU, and OTS. Consistent naming speeds slating and post.
Run a Tabletop Rehearsal
Walk through the shot list with the director, cinematographer, assistant director, sound, art, and production design. Read beats in order, check for missing cutaways or transitions, and confirm that technical and performance notes are achievable with the planned time and gear.
Update After the Scout
During the tech scout, record measurements, power access, sun path, noise windows, and staging space. Replace assumptions with specifics such as lens distances, blocking paths, and backup indoor positions in case of weather.
Important:
Revisit time estimates after the scout. Real locations often change lighting and movement choices, which shifts the day plan.
Distribute Versions and Track Revisions
Export a clean PDF for departments and a live sheet for the script supervisor. Version labels should include date and incremental number. Keep a brief change log so the team knows what changed and why.
Use On Set and Mark Status
Print or load the list on a tablet. Mark shots as planned, in progress, complete, hold, or reshoot. Add short notes on surprises that affect later setups. A marked list becomes the single source of truth during a fast day.
Create a Pickup List and Hand Off to Post
After wrap, flag missed angles or inserts as pickups with locations and availability constraints. Share the final marked list with the editor along with slate formats, roll numbers, and file-naming conventions. This shortens the path from ingest to a first cut.
Pro Tip:
Keep language concrete. If a note says “get some close-ups,” replace it with “CU on hands threading needle, 50 mm, tripod, static, 10 seconds.”
How to Use These Shot List Templates
These shot list templates are available in Microsoft Word and Google Docs. Open the Word file to edit locally, or in Google Docs choose File > Make a copy. Set the page size to US Letter or A4, then pick portrait for standard tables or switch to landscape if wider columns are needed.
Start by updating the header with production title, project or client, date, and a basic contact line for printed copies. Select the layout that matches the job type, such as a general video table, a social content layout, a wedding timeline, or a scene-based narrative grid. All layouts are fully editable, so sections can be renamed, expanded, or removed.
Adjust the column labels to match the shoot. Common labels include Shot No., Scene or Description, Camera Angle or Movement, Location, Time of Day, Equipment or Lens, People or Props, and Duration or Notes. Rename labels for interview work (for example, change People to Speaker) or narrative projects (change People to Cast). Remove columns that add clutter and keep the same order on every page for quick scanning.
Group related shots with section bands. Insert a full-width row labeled Intro, Product Demo, Ceremony, Interviews, or any category that suits the schedule, then apply a light background tint so the band is easy to spot in print. Enter shots one per row with a concise description, then add angle, lens, and timing. After everything is listed, reorder rows by location, lighting setup, and time of day to reduce resets without losing the original story flow.
Prepare the file for set use. Repeat the header row on each page, use thin borders, and keep row height generous enough for handwriting. Add simple status symbols in the first or last column, such as ☐ planned, ◐ in progress, and ☑ completed. Keep colors and fonts consistent, insert page breaks before new bands, and place short codes or links to storyboards or script pages inside the Notes cell. Export a clean PDF for print or tablets, and keep the editable Word or Google Docs copy for live updates.


